Monday 9 September 2013

Why Bodyweight Exercises?

Most pin-loaded weight training exercises or gym machines isolate only certain muscle groups, requiring a fairly small portion of your body's total muscle mass. Bodyweight exercises incorporate multiple muscle groups at once, with the added benefit of being much more demanding of core strength than exercises that require weights and machines.

Body-weight exercises use motions that develop muscle strength and keep you safe from the many chronic injuries, like joint problems, that come over time with weightlifting and other unnatural exercises which have little functional value in our daily lives.

For an exercise or workout to be functional, it must resemble the event being trained for as closely as possible. Keeping this in mind, the performance demands of the average person consists mainly of manipulating their own bodyweight throughout daily tasks, therefore the most functional way to develop strength in day-to-day activities is logically, bodyweight movements.

I believe that in today's society, gyms, training systems, and fad diets are mostly the result of excellent marketing rather then a genuine attempt to help a generally out of shape society.

Aside from running and swimming, most people have not been raised to use their bodyweight alone to exercise. My personal opinion is that popular fitness culture, for far too long, has not realised the numerous benefits bodyweight exercises have to offer. The exploding popularity of yoga and pilates are a wonderful example of the worth of bodyweight exercises.

Benefits of Bodyweight Exercises

* Bodyweight exercises require something you are never without: Your Body
* This style of exercise can be done anywhere, anytime, and without costly gym equipment
* Bodyweight exercises increase strength, power, and muscular endurance
* With bodyweight exercises you will develop balance, coordination, and flexibility
* Bodyweight exercises incorporate multiple muscle groups to develop overall strength
* It is necessary to activate and stabilise your core muscles when performing bodyweight exercises

There is a common myth that surrounds bodyweight exercise routines; Bodyweight exercises don't allow you to adjust the difficulty of an exercise.

Last week I was having a discussion with a fellow trainer about different training methods. When we discussed bodyweight exercises as a form of strength develop it was obvious that we were polar opposite in our beliefs. My belief is that it is pointless and illogical to add extra weight to a person if they are unable to complete an exercise or movement using their own bodyweight. My peer was adament that bodyweight exercise options are very limited and not enough to develop strength. My peer's retort was consistent with the misconception of bodyweight exercises throughout the fitness industry. 

As an advocate of bodyweight exercises for strength development programs, I like to encourage my peers to incorporate more bodyweight exercises and training methods into their sessions. I often find myself telling clients and peers that the only limiting factor with bodyweight exercises is the individual's creativity.

Here are four simple ways of changing the difficulty of an exercise without adding weights:

1) Increase or decrease the amount of leverage
2) Perform an exercise on an unstable platform
3) Use pauses or pulses at the beginning, end, and middle of movement
4) Turn the exercise into a single limb movement

For example, consider a push up, a standard exercise that works your chest, shoulders, triceps, abdominals, obliques and lower back.

If you do push ups against a wall, the exercise is pretty easy.

Option 1 - Wall push up
You can then progress to performing the push ups on an elevated surface, such as a table top, you increase the level of difficulty for the exercise.

Option 2 - Push up on a elevated surface
The lower the surface you use, the harder the exercise becomes. Most people believe that performing a push up with your hands on the floor is the hardest option available for this exercise, however this is when creativity becomes important.

Option 3 - The classic push up (Ladies perform on knees to reduce pressure on PFM)

Option 4 - Push ups with feet on an elevated surface 
If you place your feet onto a telephone book, coffee table or chair the exercise becomes significantly more difficult. This is using leverage to increase the exercise's difficulty.

To further increase the level of difficulty for an exercise you could place your hands on one or two balls. By introducing the balls into the exercise you are using an unstable surface. If this is still not difficult enough, incorporate pauses or pulses within the movement.

Option 5 - Push ups on an unstable surface
If this still isn't difficult enough apply the 4th trick to increase the difficulty of a bodyweight exercise and perform one-handed push ups.
Option 6 - One-handed push ups
The beauty of bodyweight exercises are that you have total control of the resistance, something that you simply do not have when you use pin-loaded weights or gym machines. The difficulty of bodyweight exercises can be tailored to suit the needs of virtually anyone, can be performed anywhere and at anytime. Bodyweight exercises truly are the most versatile, cost
effective, and accessible form of exercise. Ask your trainer to put you through a training session using only your bodyweight and experience for yourself this truly underrated and underused method of training.

Please let me know your thoughts and/or experiences with bodyweight exercises in the comments section below.

Do you think bodyweight exercises are useful training method?


Monday 2 September 2013

SAFE Strength Training - YES, it is possible!


-Use the BODY YOU HAVE to build the BODY YOU WANT-


Millions of women needlessly suffer from damaged pelvic floor muscles even though their suffering is preventable and curable through appropriate exercise.

There is a lot to be said about using the body you have to build the body you want. Using your own bodyweight for strength training is the key to a pain and leak free life. Bodyweight strength training will assist you to maneuver throughout your daily tasks with ease, pain free, and leak free whilst maintaining the elegance and poise of Grace Kelly.

Divert from mainstream weights training to prevent interruptions to your training routines, stress urinary incontinence and prolapse by using Bodyweight exercises for your strength training. 
Regularly engaging in strength training using your own bodyweight allows yourself and your body the chance to live a pain free, leak free, and fulfilling life unaffected by stress urinary incontinence or prolapse.

Working in gyms, I have witnessed many women training with heavy weights. I have watched women groan, strain, break and cry whilst trying to push, pull and lift weights.  It pains me to consider how many of these women are now suffering from prolapse as a result of the unnecessary downward pressures placed upon their pelvic floors.

Strength training can be achieved without lifting a single dumbbell.

Being a women, retired athlete and trainer, who has worked in the fitness industry for 10 years, I find the mainstream approach to training extremely frustrating. As a retired elite athlete and professional trainer, I know that many women who use pin-loaded or free weights do not need to push, pull or lift heavy weights on the gym floor or group exercise classes.  Personally I have been using my own bodyweight for the majority of strength training since I was 8 years old. 

My aim is to help women realise that their own bodies are the cheapest and easiest tools they have to sculpt the functional and sexy body they want.

Why bother with pointless, limiting gym exercises when their daily tasks do not require such vigorous training methods? 

Effective and safe strength training can take place in the comfort of your own home, a local park, on a plane or in a hotel room, your driving seat at a red light, and the line at the supermarket. It is as simple as the saying ‘Use the body you have, to create the body you want’.

It is my job to teach every woman that her body is her secret weapon.

Instead of punishing your body with heavy weights at the gym, try using you’re own body’s weight to become stronger. With bodyweight strength training you will gain an understanding of your physical abilities, prevent osteoporosis, increase your metabolism, develop lean muscles and tone. Instead of risking injuries by adding weight to exercises, focus on your posture, alignment, activation of the deep abdominal muscles and pelvic floor when you perform bodyweight exercises.

Krysia's top 3 lower body weight exercises for women: 


1) Body-weight squat with pulses

 
Bodyweight Squat
 

A bodyweight squat is more than just a basic lower-body motion. Your core is heavily relied upon during each repetition to keep your torso strong and tall, and because some of the largest muscle groups in your body - your glutes, for example - are targeted, this exercise rewards you with a higher calorie burn than a leg extension. Adding smaller partial reps at the bottom of the movement will bring up the burn even faster!

What to do: Stand with your feet no wider than hip-width apart feet, shoulder-width apart, and bend your knees and hips to squat. Make sure that your heels remain on the ground and that your knees do not go past your toes. Stop when your thighs are parallel to the ground, then pulse up and down (moving only a few inches) 10 times before standing. Do three sets of 15 to 20 reps.

TRAINER'S TIP: make sure to activate your core throughout the movement. I always have my clients pause after each repetition to re-activate their core before the next repetition.


2) Forward lunge with kick

 
Forward Lunge with Kick

Lunges are king when it comes to eliciting delayed onset muscle soreness (DOMS).  DOMS is that achy feeling you get in your muscles in the days following your workout.  I love lunges as this bodyweight exercise requires the individual to work through a large range of motion, recruit multiple muscles, incorporate dimensions of dynamic stretching, and places emphasis on the quads, a smaller muscle group than the glutes. Tacking a kick onto the movement gives your gultes a bit more incentive to change and grow, whilst also incorporating a dynamic stretch within the hamstrings. Lunges are a terrific exercise thanks to the recruitment of multiple muscle groups, the more muscles being used and developed equals more calories burned, even at rest.

What to do: Take a large step forward with your left foot and bend both legs until they form 90-degree angles. Make sure that you keep your front heel on the ground throughout the movement, ensuring  that your front knee does not go past your toes of the front foot (Your rear knee should be an inch or two off of the ground and the heel of your back foot lifted off the ground.) Push through left front foot to return to the start, but instead of planting your foot, raise your leg as high as you can in-front of you, being careful not to slouch forward and loose your core activation. Plank the foot and then perform the same movement on the other leg. Do three sets of 15 to 20 reps on each leg.

TRAINER'S TIP: Often when clients start to fatigue or are learning how to perform lunges they break through their mid-sections (core). When performing lunges it is essential to maintain an activated and strong core, I like to get clients to imagine there is a pole dissecting their bodies which is forcing them to stand upright throughout the movement. 


3) Glute Hip Raise with Knee Raise 

Glute Hip Raise with Knee Raise

This exercise is a pelvic floor safe, bilateral glute and hamstring strengthening exercise. Completed with correct technique, this exercise has the potential to strengthen the lower limbs whilst also developing strength in the abdominal muscles and the muscles of the lower back.

What to do: Starting the exercise laying on your back, lift your hips up towards the sky by squeezing your glute muscles together. Once your hips and buttocks are lifted off the ground, alternate lifting one foot off the ground at a time. To increase the difficulty, and to recruit your hamstring muscles further, lift your toes off the ground so that your heels are your anchor.

TRAINER'S TIP: It is important to maintain glute activation throughout this movement, if not your hips with drop and you will loose activation and stability through your core.

Tuesday 13 August 2013

Make Planking Safe for your Pelvic Floor


Forward Plank

The Plank exercise is a very popular core strength exercise performed by men and women in gyms and exercise classes world-wide. The common forward plank, as seen above, is a very effective core strengthening exercise, however if you have a pelvic prolapse or weak pelvic floor muscles, it is necessary to modify this common exercise to be pelvic floor friendly. 

This core strengthening exercise is also commonly known as a hover or bridge, and is prescribed by many physiotherapist, personal trainers, and gym class instructors.

Muscles used in Forward Plank

The Forward Plank exercise involves a range of different muscle groups in the body working to hold the body above the ground. The main muscle groups used during a Plank are the core muscles that surround the trunk; the abdominal muscles and spinal muscles. Secondary muscles are also involved in stabilising or holding the body in position during Forward Plank and these include muscles around the shoulder girdle, chest, middle back, thighs and calf.
Muscles used whilst planking

Is The Plank safe for your Pelvic Floor?

Studies have shown that intense core abdominal exercises force the pelvic floor downwards in women with weak pelvic floor muscles. The Plank performed in the traditional forward position with weight bearing through the toes is an intense core abdominal exercise and can therefore increase pressure on the pelvic floor. This means that the abdominal muscles have to work hard to support and maintain the trunk above the ground during the exercise. The longer the position is held, the longer the pelvic floor muscles need to work to counteract the downwards force that is generated during this exercise.

Safety of Plank exercises for your pelvic floor depends on a number of factors including your:
  • Current pelvic floor strength; your ability to activate and brace your pelvic floor muscles
  • History of pelvic floor surgery
  • Pelvic floor dysfunction (prolapse, incontinence, pelvic floor spasm/Vaginismus)
  • Chosen type of Plank exercise (forward plank on knees, toes or side plank)
  • Overall physical strength 

Ways to Modify Forward Plank Exercise

There are a number of ways to modify this exercise to reduce the pressure on your pelvic floor:

1. Change Plank Position

  • Kneeling Forward Plank – rather than weight bearing through the toes, modify this exercise into weight bearing through your knees (kneeling Plank) so that the abdominal muscles don’t need to work as hard to hold the body above the ground. You can also lower your toes to further reduce the load on your pelvic floor (shown below).
Kneeling Forward Plank
  • Kneeling Side Plank – The kneeling side plank (shown below) reduces the involvement of the outer abdominal six pack muscles, so that the pressure on the pelvic floor is reduced. To perform this exercise correctly; lie on your side so that your hips, shoulders and feet are stacked. From this position, raise yourself up onto your elbow and raise your hips off the ground so that your body is in a straight line body from the shoulders to the hips. Your weight should be distributed between your elbow and outer edge of your knee. 
Kneeling Side Plank

2. Decrease Plank Duration

The longer the body is held above the ground during Forward Plank exercise, the longer the pressure on the pelvic floor is maintained. If you are completing a core and pelvic floor strengthening program you may find that as you become stronger you are able to maintain The Plank for longer without impacting upon your pelvic floor. 

3. Avoid Intense Abdominal Indrawing

Recently, I was assessing another fitness instructor and was shocked to hear the instruction to draw in the abdomen strongly during The Plank. This is not necessary and will increase pressure on the pelvic floor muscles. Your abdominal muscles will be active and strengthen during this exercise – there is no need to draw in the abdomen and as a result over brace your outer abdominal muscles.

4. Breathe Normally

Try to breathe normally throughout The Plank and avoid holding your breath. Holding your breath during static exercises such as The Plank will increase blood pressure as well as the pressure on the pelvic floor muscles. Make a practice of breathing normally during exercises that require maintained positions (static exercises). 

Trainer's Tips for Correct Plank Technique:

  • Commence Plank using the modified kneeling technique described above
  • Tuck your elbows close to your body
  • Keep your shoulder blades back and down, imagine you are trying to un-clip your bra clasp with your shoulder blades
  • Keep your spine straight and your chin slightly tucked to protect your neck
  • Avoid dropping your hips
  • Breath normally throughout

Who Should Avoid Plank Exercises?

As with all exercises, the suitability of the forward plank as a core strengthening exercise is dependent on the individuals ability levels. If you are unsure about the strength of your pelvic floor muscles, then it is recommended that you see a pelvic floor physiotherapist who can assess your pelvic floor muscles and assess your suitability for this and other core exercises.

As a general rule you should avoid the forward Plank exercise if your pelvic floor is at risk with:
  • Weak pelvic floor muscles
  • Pelvic floor symptoms during or after Forward Plank exercise (symptoms such as light bladder leakage)
  • History of prolapse surgery, especially recurrent prolapse surgery
  • Pelvic pain and/or pelvic floor muscle tension
  • Pregnancy and early postpartum
If you are in doubt about your ability, or would like to learn more about pelvic floor safe core exercises seek the advice of a health professional. A health professional with a knowledge of pelvic floor safe exercise practices will be able to assist you with a suitable training program and provide you with alternative pelvic floor safe abdominal core exercises.

Wednesday 7 August 2013

Healthy Dog = Healthy Owner


After being diagnosed with a serious medical condition, I adopted my first beagle puppy, Braxley. 

Braxley has helped me navigate my way through some difficult times. He has supported and loved me when I have been too sick to leave the couch.  Braxley has motivated me to continue moving forward by demanding I take him for his daily walks. 

Braxley (12 weeks)
 There is no question that pets are good for your health, helping to do everything from lower blood pressure, to lessen symptoms of anxiety and depression. My puppy has been the loving encouragement I have needed to get up and moving since being diagnosed with my medical condition. Braxley helps me to get moving and exercising when my motivation levels are below zero.

Initially, little Braxley could not walk longer than 10 minutes without needing a rest, then today something wonderful happened, Braxley and I incorporated Fartlek training into our daily walk.

Incorporate Fartlek training into your daily walk.

Instead of streaching alone, include your bestfriend! 
Fartlek training is a training method that blends continuous (endurance) training with interval training. The variable intensity and continuous nature of this style of exercise places stress on both the aerobic and anaerobic systems. It differs from traditional interval training in that it is unstructured; our walk this morning was certainly unstructured, we ran between letter boxes, sprinted so that he could sniff many different scents, and walked when his little legs were too tired to run any further. Just like an athlete performing Fartlek training, Braxley was modifying our intensity and speed, as he wished. Most Fartlek sessions last a minimum of 45 minutes and can vary from aerobic walking to anaerobic sprinting. Braxley and I were out for over an hour and we were both exhausted when we got home. Fartlek training is generally associated with running, but can include almost any kind of exercise.

After this mornings Fartlek training I began to think about all the different ways people involve their pets into their daily exercise routine, and after a little research I came across some very innovative methods. Here are some of the different exercise methods I came across:

* Doga - Doga combines massage and meditation with gentle stretching for dogs and their owners.
Doga Class 

Stretching out the hip flexors in Doga
*Canicross - This is a snow free version of Skijor, which is a form of cross country skiing and sledding. Canicross is an excellent activity for people who enjoy cross country running and have dogs who love to run. The dog is attached to a lead which is attached to a harness on their owner. Together you navigate your way through a cross country running track. This can also be done with roller-blades, especially if your K9 companion is a speed demon.


Canicross 
Urban Canicross using Roller-blades 
 * Doggy Paddle - In the USA and UK there are providers of swimming/ aqua-aerobics sessions for you and your K9 companion. This low impact exercise offers alternative ways to keep active for people, or dogs who suffer from chronic pain. As we live in a nation with amazing beaches, try taking your dog down to the beach and paddle through the whitewash together.
Doggy Paddle        
* Climbing Stairs - Climbing stairs together will tone your legs and butt, while giving your dog a chance to melt away the Milk-Bones. Braxley and I have mastered the stairs at Kangaroo Point, Brisbane.
Take to the stairs to shake up your daily routine.  

Monday 29 July 2013

12 Intense AB Exercises to Avoid


Intense abdominal exercises are exercises which involve strong contractions of the rectus abdominis muscles and surrounding abdominal muscles. During intense abdominal exercises, such as sit ups, crunches, and planks, the upper abdominal muscles (the six-pack muscles) generate a large amount of pressure within the abdomen. The muscles surrounding the trunk, such as the external and internal obliques, as well as the transversus abdominis, manage the pressure generated by the rectus abdominal muscles.  The pelvic floor muscles withstand the downward pressure generated by the rectus abdominis muscles, which is applied to the pelvic floor.
If the pressure associated with abdominal exercises is too great for the pelvic floor muscles to withstand, then the pelvic floor is forced downwards, causing the pelvic floor muscles to stretch and weaken. 
Abdominal exercises that repeatedly force the pelvic floor downwards, or particularly intense core abdominal exercises that completely overload the pelvic floor should be modified to prevent injury to the pelvic floor in women. 
12 AB EXERCISES TO AVOID (exercises to avoid are written in RED with a safe alternative in GREEN)

The 12 abdominal exercises listed below should be avoided or modified by women to minimise the risk of pelvic floor strain and injury, particularly women who have had children, women who experience light bladder leakage (LBL) or women who have had prolapse surgery. These intense abdominal core exercises have the potential to overload the pelvic floor in women, especially those with pelvic floor dysfunction:

1.  Traditional abdominal curl or sit-up exercises 
Sit-up
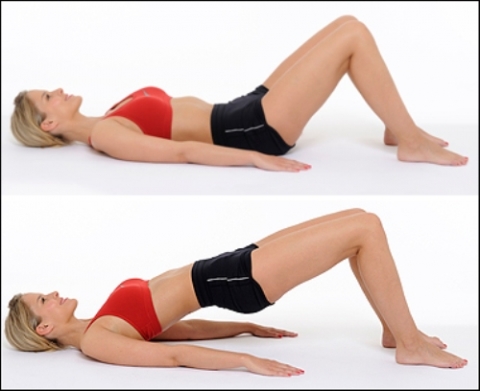
Modification: This exercise can not be modified as all other options still require a large amount of downward force on the pelvic floor. Instead I encourage clients to perform mindful pelvic floor contractions whilst performing a reverse bridge or pelvic lift (below).  
Pelvic lift 
2.  Incline sit-ups
Incline sit-up 
Modification: There is not an appropriate way to modify this exercise. I suggest standing knee raises as an alternative exercise to incline sit-ups. Make sure you perform standing knee raises with an activated core (below). Standing knee raises allow you to work on your balance and strengthen your mid-section, providing you maintain core activation. 
Standing knee raises 
3.  Abdominal machines
Abdominal Machine 
Abdominal Machine 
Machines designed to work the abdominal muscles should be avoided, especially if your goal is to strength your core without compromising your pelvic floor muscles. 
Modification: Usually trainers would recommend sit-ups or abdominal crunch exercises, however we know that these exercises are detrimental to your pelvic floor. I recommend trying reptile planks against a wall (below).  TRAINERS TIP: For beginners - do not use a swissball. Place your hands against the wall, similar to the beginning position of a wall push up. For those who are more advanced - perform the reptiles as pictured below, using a swissball. 
Reptiles - advanced option

4.  Oblique sit-ups
Oblique sit-ups
Modification: Try performing this exercise standing, as this will reduce the amount of downward pressure on the pelvic floor. Performing this exercises standing will develop balance and stability. 
Standing oblique crunch
5.  Oblique machine
Oblique machine 
6.  Exercise ball sit-ups
Exercise ball sit-ups
Modification: Instead of performing exercise ball sit-ups, use the exercise ball to perform walk outs. By maintaining an activated core you will be protecting your pelvic floor from intense downward pressure. Be sure to activate your glutes to assist you on the upward motion of the movement. 
Exercise ball walk outs - starting position
Exercise ball walk outs - finish position 
7.  Exercise ball leg raises
Exercise ball leg raises 
8.  Bicycle legs
Bicycle legs 
Modification: To modify this exercise to be pelvic floor safe, perform the exercise with one knee bent and one foot always on the ground. 
9.  Double leg raise
Double leg raise
Modification: Perform this with one leg instead of two. 
Single leg raise

10. Hanging knee raise
Hanging knee raise 

11. Pilates “Table Top” or “The Hundred”
Pilates "Table Top" 
Pilates "Hundreds"
 Modification: Perform the above exercises with your legs supported or feet on the ground (below). 
Modified "table top" (These positions can also be used for "hundreds" - but remember to keep your head down on the floor)

Supported "table top" and "hundreds"
12. Intense core “Plank” or “Hover” exercises.
Intense "Plank" (aka "Hover")
Full Plank or Hover involves full bodyweight bearing through the forearms and the feet. This is an intense abdominal core muscle exercise.
Modification: The pelvic floor loading associated with full Plank or Hover can be reduced with -
  • Kneeling rather than supporting body weight through feet
  • Breathing normally and avoid holding your breath
Plank on knees and forearm 

Tuesday 23 July 2013

Deep Abdominal Muscles - YOUR NEW BEST FRIEND

The pelvic floor muscles work with the deep muscles in your tummy, commonly referred to as the deep abdominal muscles. Understanding this partnership is important in your quest to improve your pelvic floor muscle function, as it is impossible to contract your pelvic floor muscles without contracting your deep abdominal muscles. Engaging the muscles of the abdominal wall facilitates greater pelvic floor contraction, but what is the abdominal wall and what are the deep abdominal muscles? 

The Abdominal Wall Muscles 

The external oblique, the internal oblique, transversus abdominis, and the rectus abdominis are the muscles which create the abdominal wall. The basic functions of these muscles involve providing structural support for the abdominal cavity as well as providing protection for the internal organs within the abdominal walls. The abdominal muscles also assist in the process of respiration. Contraction of the muscles of the abdominal wall usually assists in activities such as protecting and offering the spine extra stability when lifting heavy objects or assisting in the process of defecation.
Fig 1. Abdominal Muscles

The Deep Abdominal Muscles 

The deep abdominal muscles that are intimately involved with pelvic floor muscle contraction are the transversus abdominis. The transverse abdominal muscles (TA muscles) wrap around the torso from front to back and from the ribs to the pelvis. The  TA muscles run horizontally around your body, similar to a corset. 

The fourth layer of the abdominal muscles, the TA muscles, are very important muscles in assisting the pelvic floor muscles with urethral closing pressure. If your TA muscles are weak the probability of stress urinary incontinence (SUI) is highly likely. The TA muscles work with an important back muscle called multifidus, as seen in figure 2, and the co-contraction strengthens pelvic floor contraction. 


By learning how to correctly contract the TA and multifidus muscles, the function of your bladder, bowel and pelvic organ support may be improved, whilst concurrent back pain may be helped also. 
Fig 2. Core Stability Muscles

Contracting the Deep Abdominal Muscles 

In order to engage the entire muscle and to perform a correct contraction, the ribs should be flush with your body and the spine and pelvis should be in a neutral position. A neutral position is achieved when lying on your back and your pubis and pelvic bone are all evenThe cue that I like to give is to "use your muscles to pull your belly button back to your spine." I find it helpful to have clients perform the contraction on the exhale phase of the breath.  Make sure to keep the pelvis level during the contraction. 

When performing a lower abdominal exercise, such as table top ( common yoga and pilates exercise), you can tell if you are not using the TA muscles if your rectus abdominis, your six pack muscle, pokes out and looks like a loaf of bread.  Try contracting the TA muscle before you lift the legs (always lifting one leg at a time to avoid unnecessary downward pressure on your pelvic floor muscles) and see if the loaf of bread stays flat and engaged.


Fig 3. At rest 
Fig - 5 With TA muscle 
contraction -
No loaf of bread
Fig 4. Without TA muscle contraction -
the rectus abdominis pops up like a loaf of bread
Exercises to Strengthen the Transversus Abdominal Muscles

These exercises are simple, yet effective movements that work the TA muscles.  

These exercises are all about holding your position in a static pose, in order to strengthen the TA muscles.  These types of exercises, where you hold the static pose, are called isometric exercises and are great for strengthening and toning.

EXERCISE #1 - Plank Pose


TRAINER'S TIP: If you are a beginner to exercise it is recommended that you begin by planking against a wall, before progressing to planking using a chair, and then eventually planking on your knees on the floor.   


How to do the Plank Pose

Fig 6 - Plank Pose - Intermediate option 


Fig 7 - Plank Pose - Advanced option
  1. Place your elbows on the floor underneath your shoulders.
  2. Now place your knees on the floor with legs hip width apart.
  3. With back straight, keep your body lifted off the floor and pull in your belly button towards your spine
  4. Hold this position for a count of 5-15 seconds initially with the goal of being able to hold for 30-60 seconds. 
  5. Relax, placing your body back on the floor and then repeat for 3 to 5 repetitions.
Note:  Remember to breathe while you are holding your position and keep your back straight and parallel to the ground.  For increased challenge, you can also do this as a straight arm plank pose, placing your hands on the floor instead of your elbows.


EXERCISE # 2 - Transversus Abdominal Pull Ins

This TA exercise is very difficult to illustrate, as the movement is so small, it is hard to tell the difference from start to finish position.  Although the move is small, it reaches deep down to the TA muscle.

You can do this exercise either standing up or laying down.  In fact the movement is so small you can do it standing up just about anywhere without anyone knowing your are doing an ab exercise.

How to do the Transversus Pull Ins

Fig 8. Transversus Pull Ins - 

TA muscle not activated 

Fig 9. Transversus Pull Ins -
 Activated TA muscle 

  1. Lie on the floor with back flat, knees bent and feet on the floor.
  2. Place your hands on your lower abs, about where your bikini bottoms would cover, and place your thumbs touching your naval.
  3. Now pretend like you have to zip up a really tight pair of jeans and pull in your belly button towards the back of your spine.
  4. Hold for 5-15 seconds initially with the eventual goal of 30 to 60 seconds, then relax and repeat 3-5 times.
Note:  To do this TA exercise in a standing position, just repeat the steps above while standing, being sure to keep the rest of your body relaxed and focus on the TA muscle to do the work.